Real-World MVVM with Entity Framework and ASP.NET Web API
I just completed a sample application using Simple MVVM Toolkit together with Trackable Entities to build a real-world N-Tier solution with a WPF client and portable POCO entities that are automatically change-tracked and sent to an ASP.NET Web API service that uses Entity Framework to perform asynchronous CRUD operations (Create, Retrieve, Update, Delete). The sample includes a Windows Presentation Foundation client, but the toolkit has a Visual Studio template for building a multi-platform client with portable view models that are shared across WPF, Silverlight, Windows Phone, Windows Store, iOS and Android.
- Download the Simple MVVM Trackable Entities sample application here.
The nice thing about this sample is that it demonstrates how to build a complete end-to-end solution. Client-side entities don’t care if they are sent to a WCF or Web API service and are marked up for serialization using both [DataContract] and [JsonObject] attributes. Both WCF and Json.NET serializers accept attribute-free classes, but the attributes are included in order to handle cyclic references. The WPF client binds views to view models which expose entities as properties, and because ChangeTrackingCollection<T> extends ObservableCollection<T>, it is data-binding friendly.
View models have methods which call GetChanges on the change tracker, so that only changed entities are sent to the service. GetChanges traverses the object graph in all directions, including 1-1, M-1, 1-M and M-M relations, and returns only entities which have been added, modified or deleted, saving precious bandwidth and improving performance. Service operations return inserted and updated entities back to the client, which include database-generated values, such as identity and concurrency tokens. View models then invoke MergeChanges on the change tracker to update existing entities with current values.
public async void ConfirmSave()
{
if (Model == null) return;
try
{
if (IsNew)
{
// Save new entity
var createdOrder = await _orderServiceAgent.CreateOrder(Model);
Model = createdOrder;
}
else
{
// Get changes, exit if none
var changedOrder = ChangeTracker.GetChanges().SingleOrDefault();
if (changedOrder == null) return;
// Save changes
var updatedOrder = await _orderServiceAgent.UpdateOrder(changedOrder);
ChangeTracker.MergeChanges(updatedOrder);
// Unsubscribe to collection changed on order details
Model.OrderDetails.CollectionChanged -= OnOrderDetailsChanged;
// End editing
EndEdit();
}
// Notify view of confirmation
Notify(ResultNotice, new NotificationEventArgs<bool>(null, true));
}
catch (Exception ex)
{
NotifyError(null, ex);
}
}
The ConfirmSave method is from the OrderViewModelDetail class, which exposes a ResultNotice event to facilitate communication with OrderDetailView.xaml. The code-behind for OrderDetailView handles ResultNotice by setting the view’s DialogResult, which closes the dialog and sets the result to true for confirmation or false for cancellation.
public partial class OrderDetailView : Window
{
public OrderDetailView(Order order)
{
ViewModel = (OrderViewModelDetail)DataContext;
ViewModel.Initialize(order);
ViewModel.ErrorNotice += OnErrorNotice;
ViewModel.ResultNotice += OnResultNotice;
}
public OrderViewModelDetail ViewModel { get; private set; }
private void OnResultNotice(object sender, NotificationEventArgs<bool> eventArgs)
{
DialogResult = eventArgs.Data;
}
private void OnErrorNotice(object sender, NotificationEventArgs<Exception> eventArgs)
{
MessageBox.Show(eventArgs.Data.Message, “Error”);
}
private void OnUnloaded(object sender, RoutedEventArgs e)
{
ViewModel.ErrorNotice -= OnErrorNotice;
ViewModel.ResultNotice -= OnResultNotice;
}
}
I enjoyed putting the sample together because it gave me the opportunity to revisit my MVVM toolkit and soak up some of the goodness I put into it. For example, the ViewModelDetail base class implements IEditableObject by cloning and caching the entity when BeginEdit is called, and pointing the Model property of the view model to the cached entity. Because the user is working off a separate entity, the UI showing the original entity does not reflect changes the user is making until EndEdit is called, when values are copied from the working copy back to the original. CancelEdit simply points Model to the original and discards the edited version. The view model base class also includes IsEditing and IsDirty properties, which are updated appropriately.
I also took advantage of support for async and await in .NET 4.5. For example, CustomerServiceAgent provides an async GetCustomers method, which is called by the view model to bind a list of customers to a combo box. This transparently marshals code following await onto the UI thread to update the contents of the combo box.
public class CustomerServiceAgent : ICustomerServiceAgent
{
public async Task<IEnumerable<Customer>> GetCustomers()
{
const string request = “api/Customer”;
var response = await ServiceProxy.Instance.GetAsync(request);
response.EnsureSuccessStatusCode();
var result = await response.Content.ReadAsAsync<IEnumerable<Customer>>();
return result;
}
}
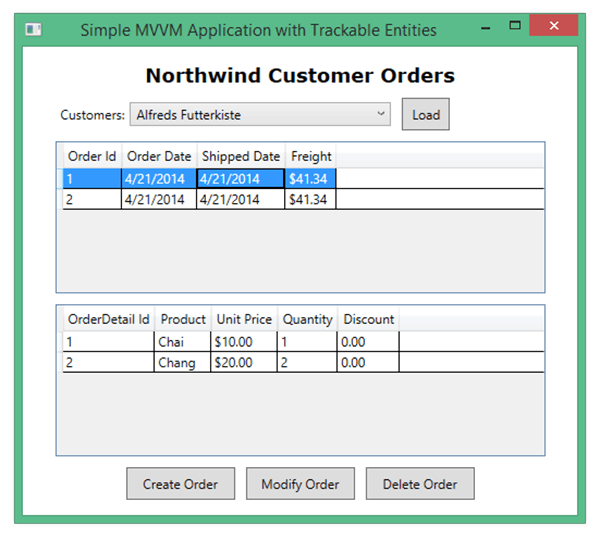
Tinkering with XAML for the views allowed me the opportunity to solve some common challenges. For example, the customer orders view has a pair of data grids that need to function in concert as master-detail, with the first grid showing orders for a selected customer, and the second grid showing details for the selected order. I had to bind SelectedIndex on the orders grid to the SelectedOrderIndex property on the view model, and bind SelectedItem to the SelectedOrder property. I got the details grid to synchronize by binding ItemsSource to SelectedOrder.OrderDetails.
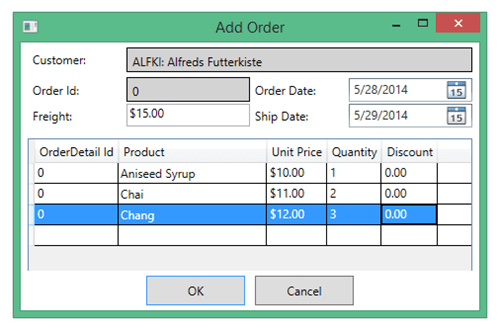
Another interesting problem was how to populate a Products data grid combo box column in the details grid on OrderDetailView.xaml. That required placing a Products property on the view model and using a RelativeSource binding on the ElementStyle and EditingElementStyle properties of the combo box column.
<DataGrid Grid.Row=“2“ Grid.Column=“0“ Height=“140“ VerticalAlignment=“Top“
ItemsSource=“{Binding Model.OrderDetails}“ AutoGenerateColumns=“False“ Margin=“0,10,0,0“ IsTabStop=“True“ TabIndex=“3“ >
<DataGrid.Columns>
<DataGridTextColumn Binding=“{Binding OrderDetailId}“ ClipboardContentBinding=“{x:Null}“ Header=“OrderDetail Id“/>
<DataGridComboBoxColumn SelectedValueBinding=“{Binding ProductId}“
SelectedValuePath=“ProductId“
DisplayMemberPath=“ProductName“
Header=“Product“ Width=“150“>
<DataGridComboBoxColumn.ElementStyle>
<Style TargetType=“ComboBox“>
<Setter Property=“ItemsSource“ Value=“{Binding RelativeSource={RelativeSource FindAncestor, AncestorType={x:Type Window}}, Path=DataContext.Products}“/>
<Setter Property=“IsReadOnly“ Value=“True“/>
</Style>
</DataGridComboBoxColumn.ElementStyle>
<DataGridComboBoxColumn.EditingElementStyle>
<Style TargetType=“ComboBox“>
<Setter Property=“ItemsSource“ Value=“{Binding RelativeSource={RelativeSource FindAncestor, AncestorType={x:Type Window}}, Path=DataContext.Products}“/>
</Style>
</DataGridComboBoxColumn.EditingElementStyle>
</DataGridComboBoxColumn>
<DataGridTextColumn Binding=“{Binding UnitPrice, StringFormat=\{0:C\}}“ ClipboardContentBinding=“{x:Null}“ Header=“Unit Price“/>
<DataGridTextColumn Binding=“{Binding Quantity}“ ClipboardContentBinding=“{x:Null}“ Header=“Quantity“/>
<DataGridTextColumn Binding=“{Binding Discount, StringFormat=\{0:F\}}“ ClipboardContentBinding=“{x:Null}“ Header=“Discount“/>
</DataGrid.Columns>
</DataGrid>
Here is a screen shot of the main view, which has a “Load” button for retrieving customers. Selecting a customer from the combo box will retrieve the customer’s orders with details.
Clicking “Create Order” will bring up the order detail view with a new Order. Clicking “Modify Order” will open the order detail view with the selected Order. Clicking “Delete Order” will prompt the user to confirm the delete, then pass the id for the selected order to the delete operation on the Orders controller of the Web API service.
Here is a screen shot of the Add Order dialog. The user interacts with the order details grid to add, modify or remove details from the order. Clicking OK will pass a new or existing order to the Orders controller, together with new or changed details. Because orders and details are change-tracked, they can be sent to a service for persistence in one round trip, so that Entity Framework can perform multiple inserts, updates and deletes within a single transaction.
On the client-side, Trackable Entities marks entities as Created, Modified or Deleted as individual properties are modified and as they are added or removed from a change tracking collection. Change state is carried with the entity across service boundaries as a simple, lightweight TrackingState enumeration. Then on the service-side, ApplyChanges is called on the order to traverses the object graph, informing the DbContext of the entity’s change state. That’s how the magic works.
Enjoy!
| Reference: | Real-World MVVM with Entity Framework and ASP.NET Web API from our NCG partner Tony Sneed at the Tony Sneed’s Blog blog. |


